
Before you can get any sort of a shot off in tennis, you need to have your racquet in your hand, ready for play. How you hold your racquet, referred to as your grip, significantly impacts any stroke you make.
You have a variety of choices when it comes to your grip. You don't have to pick just one grip. Most players use different grips on their various strokes because some grips are just better for some strokes.
At first, changing grips for different shots may seem confusing and awkward, but with practice, changing grips becomes second nature. In fact, almost all the pros change their grips — and they play a faster game than anyone else. You, on the other hand, first should understand the differences between the grips; then, as your experience and confidence grow, incorporate into your strokes the grips that feel most comfortable.
Yes, the grip introduces a confusing bit of tennis terminology. You grip your racquet on the racquet's grip, which is the part of the racquet right above the butt cap. So, the grip can be a reference either to the physical part of the racquet that you hold, or to the specific way that you hold the racquet to hit different shots.
The handle, or grip, of the racquet is an octagon. It features eight flat surfaces with bevels, or ridges, between them. When you grip the racquet for a stroke, your hand just doesn't fit into a predetermined place on the handle.
Rather, you can pick from any of the following three grips:
|
|
When you first start playing the game, experiment mostly with the eastern and continental grips. The western may feel the most comfortable on the forehand side, but hitting a decent backhand with this grip is next to impossible. As you get comfortable hitting shots with an eastern grip, you may find yourself gravitating toward the western grip for your forehand. |
The eastern grip offers you the least extreme of the grips. You can hit a passable backhand, serves, and volleys with the eastern grip, but it's outstanding for the forehand.
The eastern is not only the most basic of grips but also the reference point for the other grips, much like the "N" on a compass is the reference point for all the other directions, and the "12" on a clock face is the reference point for the time of day.
To find the eastern grip, follow these steps:
1. Hold the racquet lightly in front of you, in your left hand (or right hand, for you lefties).
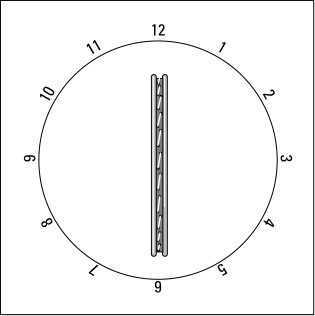
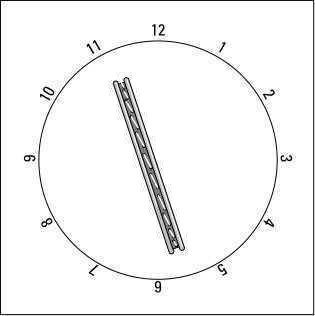
2. Turn the shaft of the racquet so that the face of the racquet is perpendicular to the ground, as shown in Figure 1.
 |
|
Figure 1: For the eastern grip, the clock points to 12 o'clock. |
If you imagine that the face of the racquet has a clock on it, the top of the racquet points to 12 o'clock.
3. Place the palm of your right hand flat on the strings.
4. Slide your palm all the way down along the shaft and handle, until you feel the bump of the butt cap.
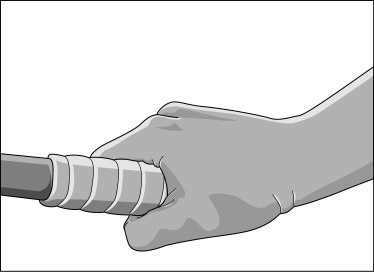
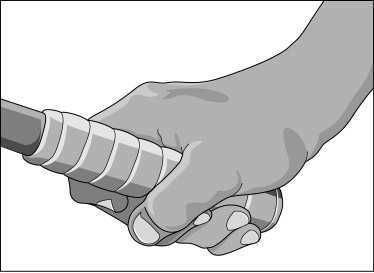
5. Wrap your fingers around the handle, spreading them slightly. (See Figure 2.)
Notice that the "V" of your thumb and forefinger lies almost directly on top of the racquet, but it's pointing back at a slight angle toward your right shoulder. You can see a good portion of your thumb on the top of the racquet.
 |
|
Figure 2: Shaking hands with the eastern grip. |
|
|
Some people call the eastern grip the "handshake" grip because you can also find it by, in effect, shaking hands with the handle of the racquet. When you shake hands, remember your tennis etiquette and say, "Hello, Mr. Racquet. I look forward to having a long and agreeable relationship with you!" |
Although it takes a little time getting used to the continental grip, you'll find that it pays off with your serves and volleys.
To find the continental grip, follow these steps:
1. Assume the eastern grip.
2. Loosen your grip so that you can turn the racquet with your left hand (or right hand, if you're a lefty).
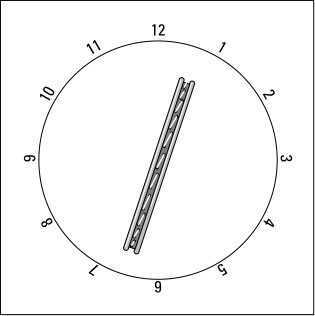
3. Turn the racquet clockwise with your left hand, until the top points to 1 o'clock, as shown in Figure 3.
If you're a lefty, turn the racquet counterclockwise until the top points to 11 o'clock.
 |
|
Figure 3: For the continental grip, the clock points to 1 o'clock. |
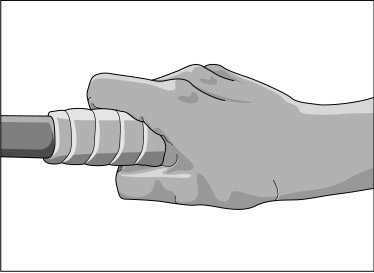
4. Wrap your fingers around the handle, spreading them slightly. (See Figure 4.)
Notice that the "V" of your thumb points toward your body, and that your thumb rests on the side of the racquet. The bottom knuckle of your index finger lies right on top of the racquet.
 |
|
Figure 4: The continental grip at its finest. |
Don't do much experimenting with the western grip until you've played awhile — the western grip is a lot to swallow when you're also trying to master the basics of your other strokes. However, if you feel the urgent need to experience the western grip, follow these steps to get into position:
1. Assume your eastern grip.
2. Loosen your grip, so that you can turn the racquet freely.
3. Turn the racquet counterclockwise, until the tip points to 11 o'clock, as shown in Figure 5.
If you're a lefty, turn it clockwise until it points to 1 o'clock.
 |
|
Figure 5: For the western grip, the clock points to 11 o'clock. |
4. Wrap your fingers around the handle, spreading them slightly. (See Figure 6.)
 |
|
Figure 6: Yeee-haaa! It's the western grip. |
Notice that the "V" of your thumb points way out to your right, and that most of your thumb is right on top of the racquet. This is a terrific grip for the forehand, but if you're unwilling to change it on your other strokes, you may end up with a woeful backhand, a pitiful volley, and a sad-sack serve.
|
|
It's strictly a one-trick pony, but that trick can be nuclear. |